2010年12月20日 星期一

sMash--使用ZRM

ZRM為定義在 app/models 下的data model,提供了簡單的HTTP RESTful的實作。只要在app/models目錄下,使用JSON定義 entity model,然後在app/resources/ 目錄下,建立一行groovy程式,即可對該model進行CRUD的RESTful操作。實際順序如下

  1. 在應用程式根目錄的 app/models/ 子目錄,建立一個json檔來描述要model的entity的schema,如下
    {
        "fields":{
            "firstname":{"type":"string"},
            "birthday":{"type":"date"}
        }
    }
  2. 在 config/ivy.xml中,加下這一行,以include zero resource的library
    <dependency name="zero.resource" org="zero" rev="[1.1.0.2, 2.0.0.0["/>   
  3. 在config/zero.config,加入下列內容。用/config/resource/dbKey設定ZRM要用那個db config,然後用/config/db/xxx 設定該db config的內容
    /config/db/test = {
        "class" : "com.ibm.db2.jcc.DB2SimpleDataSource",
        "driverType" : 4,
        "serverName" : "localhost",
        "portNumber" : 50000,
        "databaseName" : "JPATEST",
        "user" : "db2admin",
        "password" : "password"
    }
    /config/resource/dbKey = "test"
  4. 複製database driver檔案到 lib/目錄下,並 resolve
  5. 關閉eclipse,開啟CMD程式,變更路徑到應用程式根目錄,執行命令:(一定要關閉eclipse,否則無法執行)
    zero  model  sync
  6. 完成後,可發現資料庫已建立一個新的表格: persons
  7. 打開browser,執行 POST   http://server:port/resources/persons     並將一筆person的資料以JSON格式傳入,執行完成後,即可發現新建的persons 表格已建立該筆資料
    {
         “firstname”:”Janie”,
           “birthday”:”1973-12-04”
    }

2010年11月29日 星期一

資料庫的Isolation需求

資料來源

Isolation是資料庫系統的ACID其中的一個屬性。它是用來定義一個操作針對資料所做的修改 如何/何時另一個操作所看到。資料庫的Isolation層級從最高到最低排序如下。應用程式開發人員必需依照實際的需求,選用適當的Isolation層級。Isolation層級愈高,愈可能發生deadlock現象;相反地,層級愈低,資料愈可能出現不可預期的不一致現象

Serializable

Serializable是最高的Isolation層級。在此層級之下,交易是依序執行的。也就是說,同一時間內,只能有一個交易針對同一組資料進行操作。雖然資料庫系統仍可允許多個交易同時進行,但是一定要維持交易是依序執行的一個假象。

若以Lock的方式來實作Serializable,當資料庫遇到查詢中有WHERE子句時,就會Acquire一個Range Lock來鎖住WHERE子句條件中,所有牽涉到的資料;另一種非Lock的實作機制,因其不Acquire Lock,所以必需偵測當前的交易是否違反了Serializable的假象,若有違反,必需Rollback交易。Optimistic lock即為一種非Lock的實作機制

Repeatable Read

在此層級下,所有被SELECT語句碰觸到的資料都不能被其它交易所更動。也就是說,資料庫會保證在交易的範圍中,重覆讀取同一筆資料,得到的值都是一樣的。與Serializable的差別在於,Repeatable Read不會Acquire range lock,也就是說,它是讀到一筆資料後,才將該筆資料鎖住,而不會鎖住符合WHERE條件的所有資料。因為不Acquire rangle lock,可能會有phantom reads的情形發生。亦即,在同一個交易中,做兩次的SELECT,可能得到不同數目的Records。

Read Committed

在此層級下,已被一個交易讀取的資料,可以被另一個交易修改,因此無法得到Repeated Read的結果。Read的Lock在資料讀到之後,就馬上放掉;而Write的Lock還是會持續到整個交易結束後才放掉

Read Uncommitted

此層級是最鬆的層級,在此層級下,一個交易可以讀到被改動,而尚未Commit的資料。

2010年11月10日 星期三

分析Java Dump (使用IBM Java)

首先,要產生Dump檔案。在執行Java.exe時,設定-Xdump即可設定所要產生的dump檔案,詳細設定如此連結

例如
-Xdump:heap:events=load,opts=PHD+CLASSIC

在eclipse環境中,要做此設定時,首先需把Project所需的JRE設為IBM的JRE

image 

image

之後,開啟Run Configuration

image

在Arguments tab下的VM arguments處,設定產生Dump之參數

image

2010年10月28日 星期四

透過Gmail發信的Java Sample code

import javax.mail.*;
import javax.mail.internet.*;

import java.util.*;

/**
*     TestMail.class
*     這個Code是使用Java Mail的API、以google當作smtp server來發信。Java Mail可以
* 到 http://www.oracle.com/technetwork/java/index-138643.html 這個網址下載
*
* 這個Code是由下列網址下載而來
* http://stackoverflow.com/questions/46663/how-do-you-send-email-from-a-java-app-using-gmail
*
*/
public class TestMail {

    /**
     * @param args
     */
    public static void main(String[] args) {
        // TODO Auto-generated method stub
        sendMail();
    }
    public static void sendMail(){
        String host = "smtp.gmail.com";
        String from = "id"; /* gmail的ID,只取@前面的部分 */
        String pass = "";
        Properties props = System.getProperties();
        props.put("mail.smtp.starttls.enable", "true"); // added this line
        props.put("mail.smtp.host", host);
        props.put("mail.smtp.user", from);
        props.put("mail.smtp.password", pass);
        props.put("mail.smtp.port", "587");
        props.put("mail.smtp.auth", "true");

        String[] to = {"ywdeng@tw.ibm.com"}; // added this line

        Session session = Session.getDefaultInstance(props, null);
        MimeMessage message = new MimeMessage(session);
        try {
            message.setFrom(new InternetAddress(from));
               InternetAddress[] toAddress = new InternetAddress[to.length];

                // To get the array of addresses
                for( int i=0; i < to.length; i++ ) { // changed from a while loop
                    toAddress[i] = new InternetAddress(to[i]);
                }
                System.out.println(Message.RecipientType.TO);

                for( int i=0; i < toAddress.length; i++) { // changed from a while loop
                    message.addRecipient(Message.RecipientType.TO, toAddress[i]);
                }
                message.setSubject("sending in a group");
                message.setText("Welcome to JavaMail");
                Transport transport = session.getTransport("smtp");
                transport.connect(host, from, pass);
                transport.sendMessage(message, message.getAllRecipients());
                transport.close();
        } catch (AddressException e) {
            // TODO Auto-generated catch block
            e.printStackTrace();
        } catch (MessagingException e) {
            // TODO Auto-generated catch block
            e.printStackTrace();
        }

    }

}

2010年9月16日 星期四

在Hibernate中Config Connection Pool

今天試著在Hibernate中Config Connection Pool時發現 Hibernate3.3.1 GA版裡面,已經將C3P0ConnectionProvider這個class搬到 hibernate-c3p0-3.3.1.GA.jar這個Jar中了,可以到這個網址下載http://www.java2s.com/Code/Jar/GHI/Downloadhibernatec3p0331GAjar.htm

把它加到build path後,編輯persistence.xml。Mark紅色的部分,即為新增的Connection Pool設定。

<?xml version="1.0" encoding="UTF-8"?>
<persistence version="1.0" xmlns="http://java.sun.com/xml/ns/persistence" xmlns:xsi="http://www.w3.org/2001/XMLSchema-instance" xsi:schemaLocation="http://java.sun.com/xml/ns/persistence http://java.sun.com/xml/ns/persistence/persistence_1_0.xsd">
    <persistence-unit name="Test">
        <provider>org.hibernate.ejb.HibernatePersistence</provider>
            <properties>
                <property name="hibernate.connection.driver_class" value="com.ibm.db2.jcc.DB2Driver"/>
                <property name="hibernate.connection.password" value="db2admin"/>
                <property name="hibernate.connection.url" value="jdbc:db2://localhost:50000/puli"/>
                <property name="hibernate.connection.username" value="db2admin"/>
                <property name="hibernate.default_schema" value="db2admin"/>
                <property name="hibernate.dialect" value="org.hibernate.dialect.DB2Dialect"/>
                    <!--使用c3p Connection Pool -->
                <property name="hibernate.connection.provider_class" value="org.hibernate.connection.C3P0ConnectionProvider" />
                <property name="hibernate.c3p0.max_size" value="100" />
                <property name="hibernate.c3p0.min_size" value="3" />
                <property name="hibernate.c3p0.acquire_increment" value="1" />
                <property name="hibernate.c3p0.idle_test_period" value="300" />
                <property name="hibernate.c3p0.max_statements" value="0" />
                <property name="hibernate.c3p0.timeout" value="100" />
            </properties>
    </persistence-unit>
</persistence>

回到使用JPA的程式碼,假設在以下的程式碼中,在把程式由原本的standalone轉成使用connection pool後,不能在程式碼裡面呼叫JPAUtil.shutdown()這個方法,因為這個方法會把connection中斷。

public class PuliTest {
    public static void main(String[] args) {
        EntityManager newEntityManager =
        JPAUtil.getEntityManagerFactory().createEntityManager();
        EntityTransaction newEtx = newEntityManager.getTransaction();
        newEtx.begin();
        PatientBasicInfo patient = (PatientBasicInfo) newEntityManager.find(PatientBasicInfo.class, "12345");
        System.out.println(patient.getPatientfirstname());
        System.out.println(patient.getPatientlastname());
        System.out.println(patient.getPatientaddress());
        newEtx.commit();
        newEntityManager.close();
        //JPAUtil.shutdown(); 在使用connection pool的程式中,需 comment掉此method call
    }
}

2010年9月15日 星期三

使用Hibernate的JPA實作來 由DDL產生Domain Object

JPA是Java的Persistent標準,針對這個標準,不同單位有不同的實作方式,而Hibernate提供了其中一種實作的選擇。Hibernate是透過Hibernate Annotations(包含hibernate-annotations.jar、hibernate-commons- annotations.jar與ejb3-persistence.jar這些jar)和 Hibernate EntityManager(包含hibernate-entitymanager.jar這個jar) 這兩個component來進行實作。

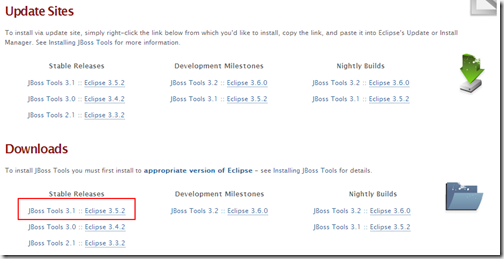
為了免除尋找這些jar的麻煩,可以直接到Jboss Tools下載Jboss的Tool pakcage,裡面就直接包含了所有Jboss的工具,包含Hibernate。下載網址:http://www.jboss.org/tools/download  (請注意不同版本的Jboss Tool需搭配不同的eclipse版本)  如下圖,可選擇Download: 下面的下載連結,把整個 package的zip下載後並解開後,再用Eclipse的add new site功能,把整個package安裝到eclipse中

image

安裝完後,開始下列步驟

  1. 打開eclipse,新增一個JPA project,填上專案名稱後按下一步
    image
  2. 設定產生的程式碼要放在那個目錄下,按下一步
    image
  3. 在JPA Facet對話框的上半部,先設定platform為Hibernate,然後在JPA Implementation中,設定Type為User Library。然後點選紅色框框處,以設定User Library
     image
  4. 新增一個User Library Entry,為其名命後按Add Jar,到下列目錄把所有的jar檔加到這個User Library Entry下
    \eclipse\plugins\org.hibernate.eclipse_3.3.1.v201006011046R-H111-GA\lib\hibernate\*.jar
    \eclipse\plugins\org.hibernate.eclipse_3.3.1.v201006011046R-H111-GA\lib\tools\*.jar
    \eclipse\plugins\org.hibernate.eclipse_3.3.1.v201006011046R-H111-GA\lib\annotations\*.jar
    image
  5. 加完之後,回到JPA Facet對話框,勾選剛才新建的User Library
    image
  6. 在JPA Facet對話框中間,點選 Add Connections
    image
  7. 此時會打開Database設定對話框,設定connection名稱後,按下一步
    image
  8. 在下一個對話框中,點選如下圖的圖示
    image
  9. 在New Driver Definition處,選定資料庫為IBM Data Server Driver for JDBC後,點選 Jar List的tab
    image
  10. 按下clear all後,重新指定db2 driver的位置
    image
  11. 完成後,回到設定資料庫連結對話框。完成後,按下finish
    image
  12. 回到JPA Facet,勾選下圖的設定後,按finish
    image
  13. 完成後,回到File—>New—>Others ,找到 JPA下的Entities From Tables
    image
  14. 一直按下一步,到下列對話框可以選擇要將那些Table Mapping成Entity。勾選完畢後,uncheck 同步class到persistence.xml,按下一步 
    image
  15. 對話框中會列出這些Table之間的association的關係
    image
  16. 填上產生的Code要到那個package下,按完成。即自動建立這些所需的class
    image
  17. 到此完成Domain class的建立。如前所述Hibernate是透過EntityManager這個Component來實作JPA的persistence。建立一個Utility class來取得EntityManager。若仔細看的話,可以發現EntityManager的角色類似Hibernate本身的Session

    package test.puli.util;

    import javax.persistence.EntityManagerFactory;
    import javax.persistence.Persistence;

    public class JPAUtil {
        private static EntityManagerFactory entityManagerFactory;
        static {
            try {
                entityManagerFactory =
                    Persistence.createEntityManagerFactory("Test"); //對應至persistence.xml中的persistent unit
            }
            catch(Throwable ex) {
                throw new ExceptionInInitializerError(ex);
            }
        }
        public static EntityManagerFactory getEntityManagerFactory() {
            return entityManagerFactory;
        }
        public static void shutdown() {
            getEntityManagerFactory().close();
        }
    }


  18. 再建立Test的class來進行測試

    import java.util.List;
    import javax.persistence.*;
    import test.puli.model.*;
    import test.puli.util.JPAUtil;

    public class PuliTest {
        public static void main(String[] args) {
            EntityManager newEntityManager =
            JPAUtil.getEntityManagerFactory().createEntityManager();
            EntityTransaction newEtx = newEntityManager.getTransaction();
            newEtx.begin();
            PatientBasicInfo patient = (PatientBasicInfo) newEntityManager.find(PatientBasicInfo.class, "12345");
            System.out.println(patient.getPatientfirstname());
            System.out.println(patient.getPatientlastname());
            System.out.println(patient.getPatientaddress());
            newEtx.commit();
            newEntityManager.close();
            JPAUtil.shutdown();
        }
    }

  19. 修改persistence.xml如下

    <?xml version="1.0" encoding="UTF-8"?>
    <persistence version="1.0" xmlns="http://java.sun.com/xml/ns/persistence" xmlns:xsi="http://www.w3.org/2001/XMLSchema-instance" xsi:schemaLocation="http://java.sun.com/xml/ns/persistence http://java.sun.com/xml/ns/persistence/persistence_1_0.xsd">
        <persistence-unit name="Test">
            <provider>org.hibernate.ejb.HibernatePersistence</provider>
                <properties>
                    <property name="hibernate.connection.driver_class" value="com.ibm.db2.jcc.DB2Driver"/>
                    <property name="hibernate.connection.password" value="db2admin"/>
                    <property name="hibernate.connection.url" value="jdbc:db2://localhost:50000/puli"/>
                    <property name="hibernate.connection.username" value="db2admin"/>
                    <property name="hibernate.default_schema" value="db2admin"/>
                    <property name="hibernate.dialect" value="org.hibernate.dialect.DB2Dialect"/>

                </properties>
        </persistence-unit>
    </persistence>

  20. 執行上述的class
     

2010年9月14日 星期二

如何Parse URL的Query String

資料來源:http://www.coderanch.com/t/383310/java/java/parse-url-query-string-parameter

Java的String有 split()這個類似 perl的分割字串的方法,使用它來Parse URL的sample程式碼如下

1、先寫好getQueryMap

  1. public static Map<String, String> getQueryMap(String query) 
  2.     String[] params = query.split("&"); 
  3.     Map<String, String> map = new HashMap<String, String>(); 
  4. for (String param : params) 
  5.     { 
  6.         String name = param.split("=")[0]; 
  7.         String value = param.split("=")[1]; 
  8.         map.put(name, value); 
  9.     } 
  10. return map; 

2、在需要的地方呼叫getQueryMap()這個方法

  1. String query = url.getQuery(); 
  2. Map<String, String> map = getQueryMap(query); 
  3. Set<String> keys = map.keySet(); 
  4. for (String key : keys) 
  5.    System.out.println("Name=" + key); 
  6.    System.out.println("Value=" + map.get(key));